How to use Remote TestKit with NativeDriver
You can also use the test automation tool NativeDriver via Remote TestKit.
NativeDriver is a testing framework specifically optimized for Android native applications. By using this framework in conjunction with Remote TestKit, you can carry out automated testing of native applications on a wide range of devices.
*In order to use this function, you need to set up ADB on your computer.
Unless otherwise specified, command-line tool refers to Command Prompt on Windows and Terminal on Mac.
*This page does not cover the system requirements needed to check-out and build NativeDriver or how to install and set up Eclipse. Information on this can be found in a variety of sources including books and the web.
Downloading and Building NativeDriver
First you need download the NativeDriver source code. Go to GettingStartedAndroid in Google Code and check-out the NativeDriver repository with SVN.(*During this process, a prompt for a username and password will appear when checking out the source code for iPhone. Leave them empty and press the Enter key.)
$ svn checkout http://nativedriver.googlecode.com/svn/trunk nativedriver
Change to the downloaded source directory and use the ant command to build the NativeDriver libraries.
$ cd nativedriver/android
$ ant
If it is successful, the following directory and files will be generated in the build directory.
$ cd build/
$ ls -la
合計 32816
drwxr-xr-x+ 1 testuser none        0 7月  25 20:23 .
drwxr-xr-x+ 1 testuser none        0 7月  25 20:23 ..
-rwxr-xr-x  1 testuser none    15518 7月  25 20:23 client.jar
-rwxr-xr-x  1 testuser none 14267411 7月  25 20:23 client-prejarjar.jar
-rwxr-xr-x  1 testuser none  1764901 7月  25 20:23 client-standalone.jar
-rwxr-xr-x  1 testuser none     7660 7月  25 20:23 common.jar
-rwxr-xr-x  1 testuser none    76742 7月  25 20:23 server.jar
-rwxr-xr-x  1 testuser none 15047644 7月  25 20:23 server-prejarjar.jar
-rwxr-xr-x  1 testuser none  2407619 7月  25 20:23 server-standalone.jar
$
Importing Sample Project
The downloaded NativeDriver repository contains code for a sample app and test. Use these to test integration with Remote TestKit.
Start Eclipse and import the sample app and test code.
Follow the steps below to import.
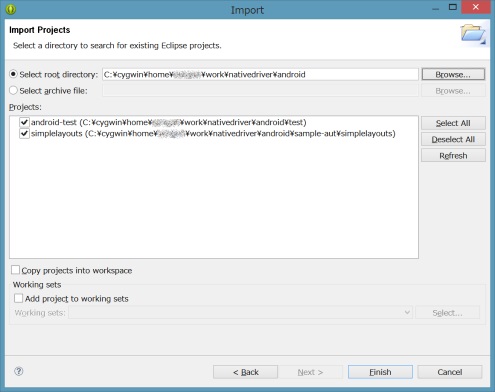
- Click the “File” -> “Import” menu item.
- Select “General” -> ”Existing Projects into Workspace” and click Next.
- Click Browse and select nativedriver/android directory.
- Make sure that “android-test” and “simplelayouts” have been added to “Projects”, and click Finish.
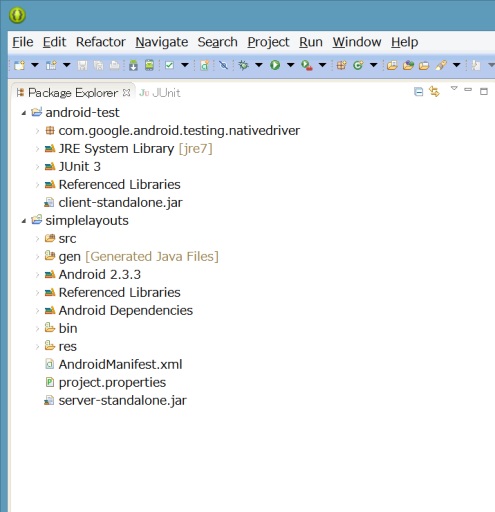
Once import has been completed, it should look like this in Package Explorer.
Making the Sample App Testable with NativeDriver
To make the sample application testable with NativeDriver:
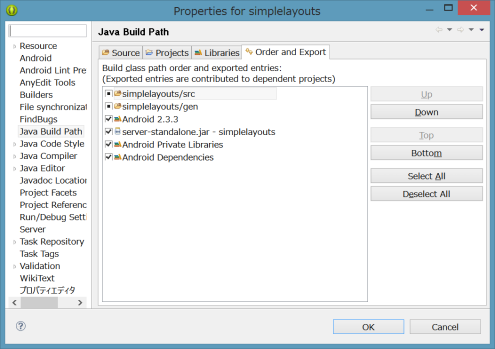
First right click on the simplelayouts project sample app to open the properties, click Java Build Path on the menu to the left, check the boxes by Android 2.3.3* and server-standalone.jar, and click OK. *The GettingStartedAndroid document lists that Android SDK 2.2 or later is required for the simplelayouts sample application, so be sure to install the package for version 2.3.3 from Android SDK Manager beforehand.
Set the Project Build Target to 2.3.3.
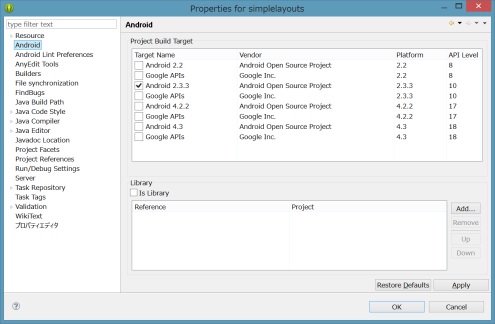
Select Build Path, check the boxes by Android 2.3.3 and server-standalone.jar, and save.
Right click on the android-test sample test to open the properties, click Java Build Path on the menu to the left, check the boxes by client-standalone.jar and JUnit3, and click OK.

Setting up a Device in Remote TestKit
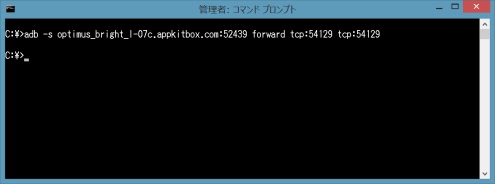
Since you have already set the Build Target for the simplelayouts sample app to 2.3.3 (see above), once you have begun renting/started up the 2.3.3 device in Remote TestKit, select ADT/DDMS/abd under Device Function in the device window to enable integration with ADT/DDMS/abd. Then open the command-line tool and enter the following command to obtain the device ID of the attached device.
adb devices
This will return the following device ID. In the example below, the device ID is optimus_bright_l-07c.appkitbox.com:52439.
adb devices
List of devices attached
optimus_bright_l-07c.appkitbox.com:52439	device
Next enter the following command to port-forward.
adb -s [deviceID] forward tcp:54129 tcp:54129
Building and Installing the Application
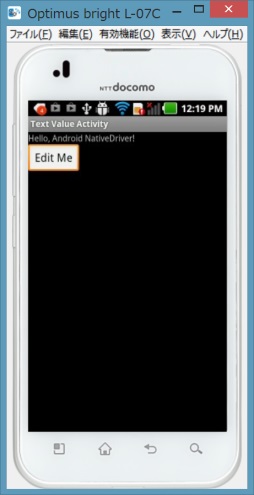
Right click on the simplelayouts sample application and select “Run as” -> “Android Application” to build and install the application.
*If installation fails due to timeout, select Window -> Preferences in the Eclipse menu and the Preferences dialogue box will appear. Then select ”DDMS” under ”Android” in the menu, increase the ADB connection timeout value (e.g. 10000) and try again.
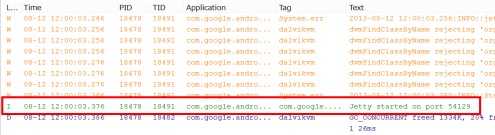
After confirming that the application has been installed in the rented device with Remote TestKit, run the following command to enable instrumentation and restart the application.
adb shell am instrument com.google.android.testing.nativedriver.simplelayouts/com.
google.android.testing.nativedriver.server.ServerInstrumentation
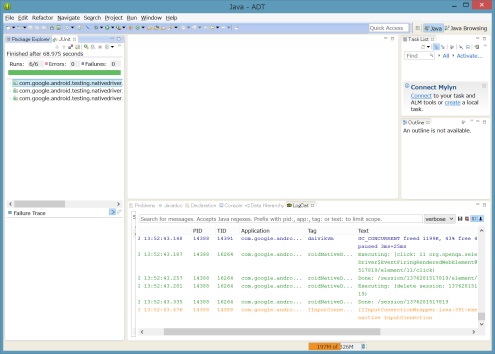
If the message “Jetty started on port 54129″ appears in the Eclipse logcat window, you are ready to run the test.
Running the Test
Right click on the android-test sample test, select “Run as” -> “JUnit Test”, and the test will start.